
I really like Recalbox but also love having OSMC as my main media center.
So, after a bit of trial and error - I was able to make a nice dual-boot system.
These instructions are for OSMC but also work just fine with OpenELEC.
--------------------------------------------------------------------------------
Update
I have now made pre-built images that are "ready to go".
These are the preferred method.
The manual method in this post is outdated.
Get them HERE
--------------------------------------------------------------------------------
Here is how
Download NOOBS Lite HERE (approx 20MB)
Unzip the contents into a folder called NOOBS.
Download latest Recalbox .zip from HERE (approx 370MB)

(As of writing, the latest is recalboxOS-v3.3.0-beta15.zip)
Unzip the contents into another folder called RECALBOX.
Move the RECALBOX/os/recalboxOS-rpi2 folder into your NOOBS/os folder.
So, you should now have a NOOBS/os/recalboxOS-rpi2 folder

Format your SD card using SD Card Formatter
Make sure you set Option -> Format Size Adjustment to ON.

Double check you have selected the correct drive for the SD card and then click Format.
Once formatted, copy the contents of the NOOBS folder into the root of the SD card.
The total size used on the SD card should be around 190-250MB.

Eject the SD card and put it in your Raspberry Pi.
Connect the Raspberry Pi to your network.
(You must use wired ethernet as NOOBS does not support WiFi)
Boot the Pi.
Select recalboxOS-rpi2 and OSMC_Pi2 to install.
Note: You can install OpenELEC instead of OSMC if you prefer it.

You may need to scroll down to get to OSMC_Pi2.
Once you have selected both OS's, simply press i or click Install.
OSMC will be downloaded and both systems will be installed.
You can now boot into either system - Yippee!
Now, let's make the KODI shortcuts in Recalbox boot into our OSMC system instead of the built-in KODI.
First boot the Raspberry Pi into Recalbox.
Now we need to SSH into Recalbox.
We do this using a program called Putty on a Windows computer that is on the same network as the Pi.
Download putty.exe from here
Save it somewhere you can easily find it.
It's portable - which means it doesn't need to be installed.
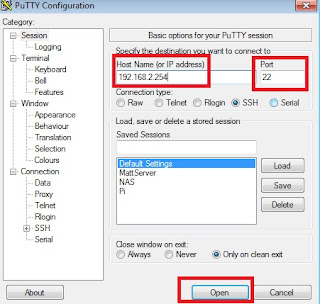
Open the downloaded putty.exe to start Putty.
Enter the Pi's IP address in the host name field and make sure the port is 22.
(Often you can find the IP by looking at the DHCP client list in your router settings page.)
Then click Open.
You should see "login as:" appear.
Type root and hit enter. Now type in the password recalboxrootand hit enter.
You should now be logged into the Pi remotely.
Now, you can copy the below commands into the terminal window.
First, let's backup the original KODI launcher script
cp /recalbox/scripts/kodilauncher.sh /recalbox/scripts/kodilauncher.buNow let's change it's contents
echo ''> /recalbox/scripts/kodilauncher.sh nano /recalbox/scripts/kodilauncher.shCopy the below code into the editor
#!/bin/bash echo 9 > /sys/module/bcm2709/parameters/reboot_part /sbin/reboot sleep 5 exit 0 Save and exit the editor (Ctrl-X, Y, ENTER)
9 is the partition number of the OSMC boot partition. In most cases this is correct.
If 9 boots back into Recalbox, try 6 instead.
Let's also make sure Recalbox does not over-write this script when updating.
nano /recalbox/scripts/rsync-update/always-exclude.cfgAdd the below line to this file
/recalbox/scripts/kodilauncher.shSave and exit the editor (Ctr-X, Y, ENTER)
This will stop the updater from overwriting our modified KODI launcher script.
Now, in Recalbox click the KODI link.
It should exit and boot into OSMC.
A thing to remember with using a reboot like this is that it bypasses NOOBS.
Therefore NOOBS won't remember this as the last system booted.
I actually like this - as I always want my Pi to boot into OSMC.
So if I switch to Recalbox and then reboot the Pi - it will still boot into OSMC.
One last thing...
Let's make it easy to boot back into Recalbox from within KODI.
I have created a simple KODI add-on that runs the above reboot snippet.
The addon can be downloaded HERE
(This addon works in OSMC & OpenELEC on the Pi1 & Pi2)
Simply install the addon via KODI -> Settings -> Addons -> Install from zip file
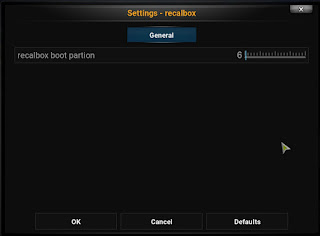
The boot partition number can be changed in the add-on settings if need be.
If 6 (default) doesn't work, try 8.
(Optional)
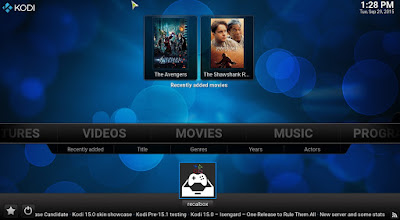
You can add a shortcut to the add-on to appear under sections on the main menu in KODI like below.
To do this, in KODI head to System -> Settings -> Appearance.
With the left "Skin" menu item selected, click into "Settings" on the right.

Now go down to "Add-on Shortcuts".
On the right, move down to spare "Add-on [num]" under one of the sections.
I have mine in the Videos sub-menu, but you can also put it under Music, Pictures or Programs.
On the right, move down to spare "Add-on [num]" under one of the sections.
I have mine in the Videos sub-menu, but you can also put it under Music, Pictures or Programs.

Select and then you can select which Add-on you would like the shortcut to point to.

Select the recalbox add-on. recalbox should now appear next to "Add-on [num]"
That's it - the add-on shortcut will now appear on the main menu under your chosen sub-menu.
(Optional)
If you are like me and want the Pi to always boot into OSMC / OpenELEC then you can do the below.
First remove the SD card from your Pi and put back into your PC.
Now create a file called autoboot.txt in the root of the SD card.In this file add the below line
boot_partition=9
(If you want to boot into Recalbox instead, change 9 to 6)

Save the file.
Put the SD card back into your Pi.
Now your Pi will always boot directly into OSMC / OpenELEC.
You won't see the OS selection screen etc.If your in New Zealand and need a Raspberry Pi...
PiShop.nz