Part 2 (Hardware Setup) can be found here
First of all, we will need to download my minimal image as a base for our project.
It's small, fast to boot and doesn't contain any unnecessary bloat.
It can be downloaded from my post here
(Grab the Wheezy image)
You can follow this guide to burn it to your SD card (in Windows)
Once it is burned, insert the SD card into your Raspberry Pi and also connect a USB keyboard to the USB port. If you are using a A+ model, simply unplug the WiFi dongle as we won't require this just yet.
Step 1 - Configuring the WiFi Dongle
First we need to configure the WiFi dongle to connect to our network.Boot up the Pi (it will reboot once to resize).
Once at the terminal "RPI Login" prompt, login as the root user.
Username: root
Password: raspberry
Now, let's edit the network configuration file.
nano /etc/network/interfaces
The contents will look like this

Under the iface eth0 inet dhcp line, we will add our WiFi configuration.
We will be using a static IP address as we need to call this address to activate the relay.
If we used a DHCP address, it could change and then we wouldn't be able to communicate with it.
You will need to select an IP address in the same range as your router.
My router uses 192.168.2.2 -> 192.168.2.255 range, so I chose 192.168.2.254 as the address for the Pi.
Using an address higher up in the range minimizes the risk of the router giving another DHCP client the same address.
Set the netmask (often 255.255.255.0) and the gateway (the routers IP address).
Set wpa-ssid to your WiFi's name, and set wpa-psk to your WiFi password.
Your file should now look similar to below:

Now, let's save and exit.
Press CTRL-X, then Y to save, then ENTER to keep the same file-name.
Now, shutdown the Pi
shutdown -h now
Once the green LED stops blinking we have finished shutting down.
Unplug the keyboard and plug in the USB WiFi dongle.
Remove the Pi's power plug and plug it back in to boot.
The Pi should boot, and after a few seconds the blue light on the WiFi dongle should start blinking.
When it goes solid - it means it has connected to the WiFi network. YAH!
If it turns off, it means it has failed to connect. If this is the case - check your network file.
We will now remotely connect to the Pi over the network.
We will use a program called Putty to accomplish this.
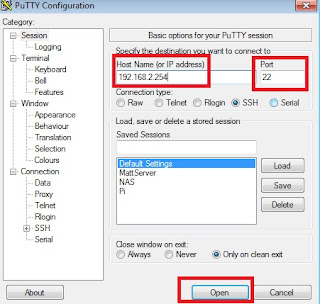
Step 2 - Accessing the Pi remotely using Putty
Download putty.exe from hereSave it somewhere you can easily find it.
It's portable - which means it doesn't need to be installed.
Double click the saved putty.exe to start Putty.
Enter the Pi's IP address in the host name field and make sure the port is 22.
Then click Open.
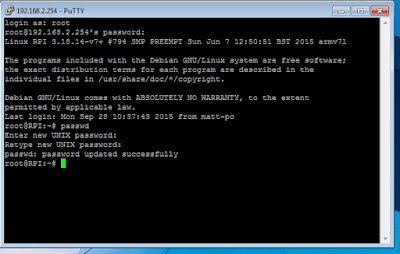
You should see "login as:" appear.
Type root and hit enter. Now type in the password raspberry
You should now be logged into the Pi remotely.
Step 3 - Initial setup of the Pi
Setting a new root password
Firstly, let's set a new root password for better security.Type passwd and then enter in the putty terminal
It will ask you for your new password.
Type your new password (it won't show any characters).
Hit ENTER then type the password again, then ENTER.
If you did it correctly, it should say the password has been updated.
Delete the 'pi' user
We will only be using the root user, so we can delete the 'pi' user.
To do this simply enter the below command into the terminal.userdel -r pi
Don't worry if it warns you about a mail spool directory.
Update Pi Software
We will now update the Pi's software and kernel to the latest.Enter the commands below one after another.
apt-get update
apt-get -y dist-upgrade
rpi-update
Once the rpi-update is done, it will say you need to reboot. So let's do that. Enter the command below
reboot
You will need to close the Putty window and re-connect after the Pi boots back up.
Remember to login using the new password you set above.
Step 4- Install our project dependencies
Install pip (also installs python) and rpi.gpio package
We will need pip which is a program which lets us easily install Python packages. We we will of course need python (pip will install this) and the Python RPI.GPIO library for talking to our relay. Let's install these now.
apt-get -y install python-pip python-rpi.gpio
Install Bottle.py
Bottle.py is a great small python package which will allow us to run a very simple web server on the Pi.Let's install it using the newly installed pip.
pip install bottle
Finally we are ready to start writing our actual garage door opener program!
We will do this in Part 4 which is now live HERE