The only cost is the domain registration :)
Our domain name will be registered through CrazyDomains.
Our DNS will be provided by CloudFlare.
Our emails will be routed using MailGun to a free Gmail account.
Our blog will be provided by Blogger.
Let's get started.
In this example. I will be using a new domain called mynamegoeshere.com.
My email address will be hi@mynamegoeshere.com.
I will also have a catch-all email address so movies@mynamegoeshere.com, pizza@mynamegoeshere.com etc also make it to my inbox.
-------------------------------------------------------------------------
Our first step is to create our free gmail account where our emails will be sent to.
If you already have a gmail account / another email account you want to use - then you don't need to do this step. The main thing is being able to change your Send From / SMTP settings to use your new domain.
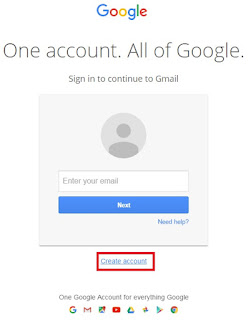
Head over to gmail.com and click "Create account"
![]()
Fill in all the fields. I will be using mynamegoesheredotcom@gmail.com as my free email address.
This is what you will use to login to gmail to check your emails.
Note: You won't actually give people this @gmail address, it is simply your mailbox where your @domain emails will be forwarded to. We will also set it up so you can send emails using the @domain address through Gmail.
![]()
Once registered, you will get a welcome screen as above.
Then click "Continue to Gmail" and you will be in your new webmail.
![]()
This is where you will login and view all your emails etc.
If you already have a domain registered with any provider, then you don't need to do this step.
You will just need to change the NS (Name server) records in a later step.
![]()
![]()
![]()
Crazy domains will now probably try to offer you some promotions.
Skip pass these by clicking "Continue Order"
You will end up on the payment page.
![]()
Fill in your payment details and click "Pay & Activate".
Note: Deselect "Auto product renewal" if you don't want the domain to automatically renew every year.
-------------------------------------------------------------------------
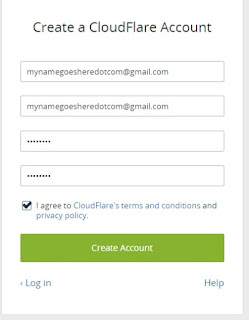
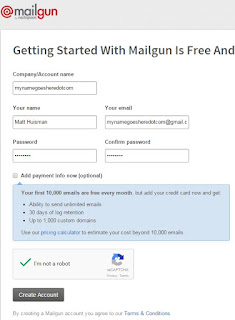
![]()
Fill in the simple form again using our @gmail email address and then click "Create Account"
![]()
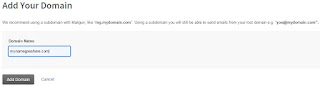
We now need to add our new @domain name.
![]()
Now wait for it to scan your domains records.
Hit Continue once scanned.
It will show you a bunch of records.
Delete all the records shown by clicking the "X" so you have no records listed.
![]()
We now have a clean slate to add in our new records.
We will have records for our emails and blog.
First we need to find out what records to add....
Keep this page open and open a new page / tab to do the next steps
-------------------------------------------------------------------------
Next, let's get the Blog registered.
(The blog is optional)
Head to blogger.com
It may ask you to sign-in.
If so, use the @gmail email address and password you have just created.
Now click "Create a limited Blogger profile".
![]()
![]()
![]()
![]()
![]()
It will give you an error and tell you that 2x DNS records need to be added.
![]()
Pop back to the CloudFlare tab and add in these 2x records.
They both will be CNAME type records.
Copy the name into the name field and Destination into the Domain name field.
Then click Add Record.
![]()
![]()
You should now have 2x DNS records listed for your domain.
![]()
Let's also add the main records that will point our domain to our blog.
We need to add 4x A type records with the following values
216.239.32.21
216.239.34.21
216.239.36.21
216.239.38.21
Set the name for each record to "@" like below.
![]()
Do the same but changing the IPv4 address to each of the above.
![]()
That is all our blog DNS records done.
Keep the CloudFlare tab open and switch back to the other tab to complete the next steps.
It is OK to close the Blog page now - we will come back to this.
-------------------------------------------------------------------------
The next step is to setup our MailGun account.
This is a free service which will route our emails to our @gmail account.
Head over to mailgun.com
Click "Try Mailgun Now"
Fill in the form again using your @gmail email address.
![]()
Once filled, click I'm not a robot.
(If you plan on having more than 10,000 emails a month this blog post is not for you.)
On the next screen, click "Add Your Domain"
You will have a warning message at the top of the screen about activation. Ignore this for now.
In the Domain Name field, enter in your newly registered domain.
![]()
Click "Add Domain"
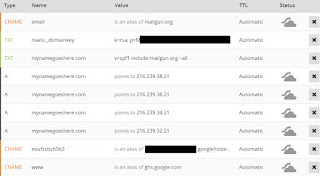
You should now see a success message and then it will list all the DNS records that we need to add.
![]()
Just like what we did with our Blog DNS records, we now need to add these records.
First, let's add the 2x TXT records and 1x CNAME records.
Simply copy the values from the MailGun page to the CloudFlare page.
![]()
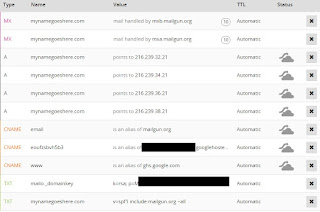
Once they are added, your DNS records should look like below
![]()
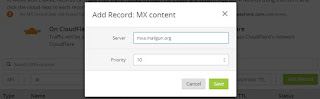
Now, we need to add in the 2x MX records.
With these 2x records, use MX as the Type and @ as the Name field.
Then click "Click to configure".
A popup box will let you input the MX server and priority.
Put in the values provided on the MailGun page and click Save.
![]()
Then click Add Records.
After you have done both records, your records should look like
![]()
That's all our DNS records done!
You can now close the MailGun page, but keep the Cloudflare page open as we need that next.
-------------------------------------------------------------------------
Next we need to update our name server DNS records in CrazyDomains to point to our CloudFlare records.
Click "Continue" on the CloudFlare page.
Select the "Free website" plan.
Click "Continue"
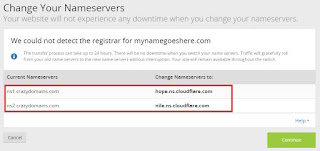
It will now show you your new name server records.
![]()
Keep this page open and open a new page / tab.
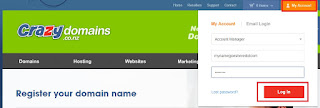
Navigate back to crazydomains.co.nz and login if needed by clicking My Account.
Keep it as "Account Manager", enter the username & password you registered with and click "Login"
![]()
Click the www icon and you should see the domain you registered earlier as well as the current name server records that we need to change.
![]()
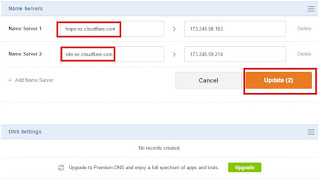
Hover over one of the name server records and click the "modify" link that appears to the right.
Copy the CloudFlare values into the corresponding fields and then click "Update".
![]()
Our domain name now points to our CloudFlare DNS records which then point to our blog.
It can take up-to 24 hours for name server records to be updated across the web, so it won't work just yet.
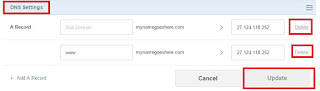
Under the Name Servers section, you will see some records in the "DNS Settings" section.
We don't need these records as CloudFlare will contain these for us, so we can delete these.
Hover over one of the records and click the "modify" link that appears to the right.
Now click "Delete" on both the records, then click "Update"
![]()
Close the CrazyDomains page as we are now finished with it.
Switch back to the CloudFlare name servers page and click "Continue".
You will then see a page like this
![]()
It will show Pending until the name server are detected as changed (can take up-to 24 hours)
You should have 7 DNS records and 0 On CloudFlare records.
CloudFlare is actually a great service and helps speed up your site by caching static content.
So let's enable CloudFlare for some of our records.
Click on the "0 Records" and it will bring you back to the DNS records page.
Now click on the Cloud icon for each of the A records and and www CNAME record.
The cloud should turn orange meaning that this record will use CloudFlare.
Your records should now look like this
![]()
We are now finished with the CloudFlare page and it can be closed.
-------------------------------------------------------------------------
While we wait for the name server records to be updated, let's finish off setting up our emails.
Let's first Activate our MailGun account.
Head to gmail.com and login if needed using your earlier created gmail account.
You will be taken to your webmail.
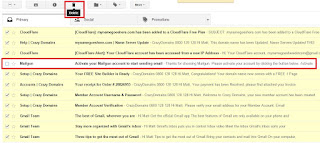
Look at all the emails we have accumulated!
We can delete all of these except the email from MailGun
![]() Once you have deleted them, click on the MailGun email to open it.
Once you have deleted them, click on the MailGun email to open it.
Then click the "Activate MailGun Account" button.
This button will take you to the MailGun website and show you an "Activated" message.
It will also log you in (how handy).
Now, click "Routes" in the top menu.
![]()
Click "Create Your First Route".
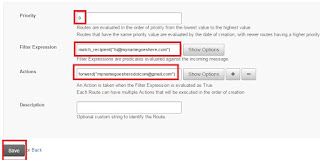
Keep the priority as 0.
Enter the below into the Filter Expression box.
match_recipient("hi@mynamegoeshere.com")
Replace hi with your desired email address and mynamegoeshere.com with your new domain.
Enter the below into the Actions box
forward("mynamegoesheredotcom@gmail.com")
Replace mynamegoesheredotcom@gmail.com with your @gmail email address.
We can leave the description blank.
Hit "Save"
![]()
The route will now be added.
Let's now add our catch-all route.
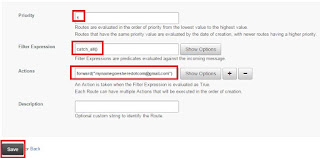
Click "Create New Route"
Set the priority to 1
Enter the below into the Filter Expression box
catch_all()
Enter the below into the Actions box
forward("mynamegoesheredotcom@gmail.com")
Replace mynamegoesheredotcom@gmail.com with your newly created @gmail email address.
We can leave the description blank.
Hit "Save"
![]()
The route will now be added.
We don't actually need the first "hi" route as the catch-all would catch it, but we will be setting this up as the email address we send from in gmail, so it's nice explicitly having a route for it. Also, we could delete the catch-all if we decided we didn't want it and not affect our hi email.
Your routes should look like below
![]()
You can see how you could easily forward the emails to non-gmail addresses or have multiple email addresses going to different gmail accounts etc.
Great, let's now setup our gmail so we can send as our @domain email address.
Click on "Domains" in the top navigation.
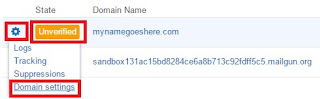
You should see your domain listed and a sandbox domain.
Click on the cog next to your domain and then click Domain Settings.
![]()
Here we will find our SMTP settings that we need for gmail.
![]()
Keep this page / tab open and do the next step in a new tab.
-------------------------------------------------------------------------
Head back to gmail.com and login with your credentials.
Click the cog on the right and then select "Settings"
![]()
Leave "Treat as an alias" selected and click Next Step.
![]()
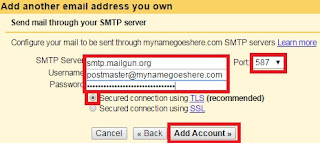
It will now ask for our SMTP credentials.
Enter in the credentials provided on the MailGun page.
Port should stay as 587 and "Secured connection using TLS" should be checked.
![]()
Click "Add Account".
Google will check the credentials and add the new email address.
A new box will appear saying a confirmation email has been sent.
(This email may not come through yet if our MailGun isn't verified due to the name server records not being updated.)
Click "Close Window" on the pop-up.
Keep this page open and swap back to the MailGun page.
Let's now try to verify the domain in MailGun.
(This relies on the name server records have being updated so don't panic if this step fails.)
If your domain is already showing as "Active", you can skip the below step.
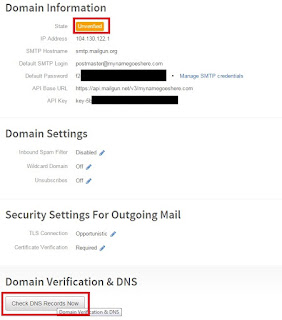
Still on the Domains settings page, scroll down and click on "Check DNS Records".
![]()
If your name server records have been updated, it should now show as "Active".
If it failed to find any of the records, then you may need to wait longer for the name server records to be changed. Over the next few hours, continue to try the Check DNS Records button.
If you find some records have a green tick but some don't, then go back to CloudFlare and double check the records are the same as they have listed. Make the required changed and check the DNS records again.
Once it is Active, we can continue.
We can close the MailGun page now.
-------------------------------------------------------------------------
Swap back to the gmail page.
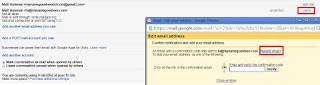
Click "verify" next to the @domain address.
On the pop-up click "Resend Email"
![]()
Then click "Close Window"
Click "Inbox" on the left to get back to your emails.
You should have an email from Mailgun saying your domain is verified.
And, we should have a confirmation email from Gmail for our new email address.
You may need to Click refresh a few times to wait for the confirmation email to come in.
Open the confirmation email, and click the confirmation link.
![]()
A new page will open - then click "Confirm" button.
Return back to your gmail inbox.
Click the cog on the right and then select "Settings"
Then click "Accounts and Import"
Now click "make default" next to the new @domain email address.
![]()
That is our emails all setup :)
You can now compose emails from your new @domain email address in gmail, and receive the replies.
Try out sending an email to yourself from another email address, also try the catchall by sending an email to anything@domain. Now you can order pizza using the email address pizza@mynamegoeshere.com or book movie tickets using starwars@mynamegoeshere.com. The emails will simply be forwarded to your inbox as normal :)
We can now close gmail and do the final step.
-------------------------------------------------------------------------
Now that our name servers have been updated, we can finish directing our domain to our blog.
Head back to blogger.com and login using your @gmail credentials.
Click back into the blog we created earlier.
Now, navigate back to Settings -> Basic and click "Set up a third-party URL for this blog" again.
Same as last time, enter in your domain name (including a www) and click "Save".
This time, there should be no errors and the domain will be added.
![]()
Now, click Edit next to the domain name.
Tick the check-box next to "Redirect mynamegoeshere.com to www.mynamegoeshere.com"
and click "Save"
![]()
We can close the Blogger page now.
-------------------------------------------------------------------------
You now have an email address at your own @domain and a blog!
Explore the blogger.com site and you can easily add contact / about pages etc.
Also, the Gmail app for your smartphone will automatically pickup the send from email addresses you have created. So, you can use the app as well as the webmail to send emails.
Our domain name will be registered through CrazyDomains.
Our DNS will be provided by CloudFlare.
Our emails will be routed using MailGun to a free Gmail account.
Our blog will be provided by Blogger.
Let's get started.
In this example. I will be using a new domain called mynamegoeshere.com.
My email address will be hi@mynamegoeshere.com.
I will also have a catch-all email address so movies@mynamegoeshere.com, pizza@mynamegoeshere.com etc also make it to my inbox.
-------------------------------------------------------------------------
Our first step is to create our free gmail account where our emails will be sent to.
If you already have a gmail account / another email account you want to use - then you don't need to do this step. The main thing is being able to change your Send From / SMTP settings to use your new domain.
Head over to gmail.com and click "Create account"
Fill in all the fields. I will be using mynamegoesheredotcom@gmail.com as my free email address.
This is what you will use to login to gmail to check your emails.
Note: You won't actually give people this @gmail address, it is simply your mailbox where your @domain emails will be forwarded to. We will also set it up so you can send emails using the @domain address through Gmail.
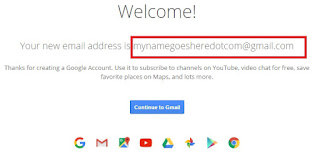
Once registered, you will get a welcome screen as above.
Then click "Continue to Gmail" and you will be in your new webmail.
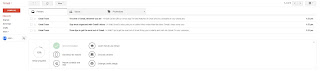
This is where you will login and view all your emails etc.
-------------------------------------------------------------------------
The next step is to register our @domain.
This is the only bit that costs so you will need a credit card.If you already have a domain registered with any provider, then you don't need to do this step.
You will just need to change the NS (Name server) records in a later step.
Head to crazydomains.co.nz
Enter the domain name you would like and click Search.

Now scroll down and click "Add" to add the domain to your cart.
Then click "Register Now" on the right.
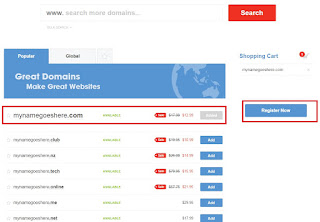
CrazyDomains will default to a registration period of 2x years.
Feel free to change this to 1x year and click Checkout. We now need to register.
Fill out the form using your new @gmail address and choose a username and password.

Note: Make sure you enter a valid address.
Click "Continue Order"Crazy domains will now probably try to offer you some promotions.
Skip pass these by clicking "Continue Order"
You will end up on the payment page.
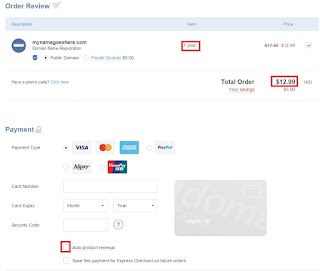
Fill in your payment details and click "Pay & Activate".
Note: Deselect "Auto product renewal" if you don't want the domain to automatically renew every year.
Your domain name will now be registered to you.
We will come back later on to update our name server DNS records.
-------------------------------------------------------------------------
The next step is to setup our CloudFlare account.
This is a free service that will manage our domains DNS entries.
Head over to cloudflare.com and click "Sign up now"

Enter your newly registered domain name in the field and click "Scan DNS Records"
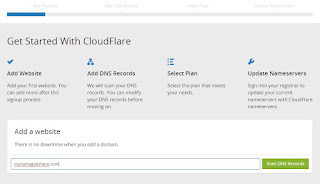
Hit Continue once scanned.
It will show you a bunch of records.
Delete all the records shown by clicking the "X" so you have no records listed.
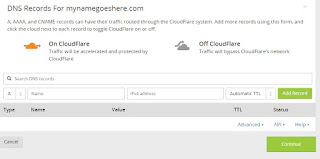
We now have a clean slate to add in our new records.
We will have records for our emails and blog.
First we need to find out what records to add....
Keep this page open and open a new page / tab to do the next steps
-------------------------------------------------------------------------
Next, let's get the Blog registered.
(The blog is optional)
Head to blogger.com
It may ask you to sign-in.
If so, use the @gmail email address and password you have just created.
Now click "Create a limited Blogger profile".

It will ask you for a Display Name, I will be using mynamegoeshere.com.
Then click "Continue to Blogger".
Once you are in the Blogger Dashboard, click "New Blog"
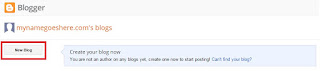
Create a title and address for your blog (we will move it to our @domain later on) and hit "Create blog"

The blog will be created.
Now, navigate to Settings -> Basic and click "Set up a third-party URL for your blog"

Enter in your newly registered domain name (including the www) and click "Save"
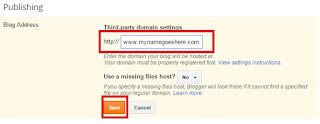
It will give you an error and tell you that 2x DNS records need to be added.
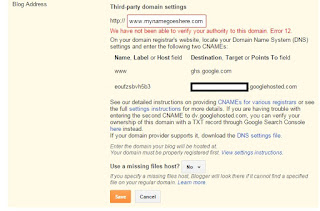
Pop back to the CloudFlare tab and add in these 2x records.
They both will be CNAME type records.
Copy the name into the name field and Destination into the Domain name field.
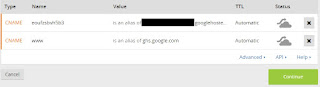
Then click Add Record.


You should now have 2x DNS records listed for your domain.
Let's also add the main records that will point our domain to our blog.
We need to add 4x A type records with the following values
216.239.32.21
216.239.34.21
216.239.36.21
216.239.38.21
Set the name for each record to "@" like below.

Your records should now look like below

That is all our blog DNS records done.
Keep the CloudFlare tab open and switch back to the other tab to complete the next steps.
It is OK to close the Blog page now - we will come back to this.
-------------------------------------------------------------------------
The next step is to setup our MailGun account.
This is a free service which will route our emails to our @gmail account.
Head over to mailgun.com
Click "Try Mailgun Now"
Fill in the form again using your @gmail email address.
Once filled, click I'm not a robot.
(If you plan on having more than 10,000 emails a month this blog post is not for you.)
On the next screen, click "Add Your Domain"
You will have a warning message at the top of the screen about activation. Ignore this for now.
In the Domain Name field, enter in your newly registered domain.
Click "Add Domain"
You should now see a success message and then it will list all the DNS records that we need to add.

Just like what we did with our Blog DNS records, we now need to add these records.
First, let's add the 2x TXT records and 1x CNAME records.
Simply copy the values from the MailGun page to the CloudFlare page.

Once they are added, your DNS records should look like below
Now, we need to add in the 2x MX records.
With these 2x records, use MX as the Type and @ as the Name field.
Then click "Click to configure".
A popup box will let you input the MX server and priority.
Put in the values provided on the MailGun page and click Save.
Then click Add Records.
After you have done both records, your records should look like
That's all our DNS records done!
You can now close the MailGun page, but keep the Cloudflare page open as we need that next.
-------------------------------------------------------------------------
Next we need to update our name server DNS records in CrazyDomains to point to our CloudFlare records.
Click "Continue" on the CloudFlare page.
Select the "Free website" plan.
Click "Continue"
It will now show you your new name server records.
Keep this page open and open a new page / tab.
Navigate back to crazydomains.co.nz and login if needed by clicking My Account.
Keep it as "Account Manager", enter the username & password you registered with and click "Login"
Click the www icon and you should see the domain you registered earlier as well as the current name server records that we need to change.

Hover over one of the name server records and click the "modify" link that appears to the right.
Copy the CloudFlare values into the corresponding fields and then click "Update".
Our domain name now points to our CloudFlare DNS records which then point to our blog.
It can take up-to 24 hours for name server records to be updated across the web, so it won't work just yet.
Under the Name Servers section, you will see some records in the "DNS Settings" section.
We don't need these records as CloudFlare will contain these for us, so we can delete these.
Hover over one of the records and click the "modify" link that appears to the right.
Now click "Delete" on both the records, then click "Update"
Close the CrazyDomains page as we are now finished with it.
Switch back to the CloudFlare name servers page and click "Continue".
You will then see a page like this

It will show Pending until the name server are detected as changed (can take up-to 24 hours)
You should have 7 DNS records and 0 On CloudFlare records.
CloudFlare is actually a great service and helps speed up your site by caching static content.
So let's enable CloudFlare for some of our records.
Click on the "0 Records" and it will bring you back to the DNS records page.
Now click on the Cloud icon for each of the A records and and www CNAME record.
The cloud should turn orange meaning that this record will use CloudFlare.
Your records should now look like this

We are now finished with the CloudFlare page and it can be closed.
-------------------------------------------------------------------------
While we wait for the name server records to be updated, let's finish off setting up our emails.
Let's first Activate our MailGun account.
Head to gmail.com and login if needed using your earlier created gmail account.
You will be taken to your webmail.
Look at all the emails we have accumulated!
We can delete all of these except the email from MailGun
Then click the "Activate MailGun Account" button.
This button will take you to the MailGun website and show you an "Activated" message.
It will also log you in (how handy).
Now, click "Routes" in the top menu.

Click "Create Your First Route".
Keep the priority as 0.
Enter the below into the Filter Expression box.
match_recipient("hi@mynamegoeshere.com")
Replace hi with your desired email address and mynamegoeshere.com with your new domain.
Enter the below into the Actions box
forward("mynamegoesheredotcom@gmail.com")
Replace mynamegoesheredotcom@gmail.com with your @gmail email address.
We can leave the description blank.
Hit "Save"
The route will now be added.
Let's now add our catch-all route.
Click "Create New Route"
Set the priority to 1
Enter the below into the Filter Expression box
catch_all()
Enter the below into the Actions box
forward("mynamegoesheredotcom@gmail.com")
Replace mynamegoesheredotcom@gmail.com with your newly created @gmail email address.
We can leave the description blank.
Hit "Save"
The route will now be added.
We don't actually need the first "hi" route as the catch-all would catch it, but we will be setting this up as the email address we send from in gmail, so it's nice explicitly having a route for it. Also, we could delete the catch-all if we decided we didn't want it and not affect our hi email.
Your routes should look like below

You can see how you could easily forward the emails to non-gmail addresses or have multiple email addresses going to different gmail accounts etc.
Great, let's now setup our gmail so we can send as our @domain email address.
Click on "Domains" in the top navigation.
You should see your domain listed and a sandbox domain.
Click on the cog next to your domain and then click Domain Settings.
Here we will find our SMTP settings that we need for gmail.

Keep this page / tab open and do the next step in a new tab.
-------------------------------------------------------------------------
Head back to gmail.com and login with your credentials.
Click the cog on the right and then select "Settings"

Click on the tab labeled "Accounts and Import" and then click "Add another email address you own".
Enter your @domain email address in the email address field.Leave "Treat as an alias" selected and click Next Step.

It will now ask for our SMTP credentials.
Enter in the credentials provided on the MailGun page.
Port should stay as 587 and "Secured connection using TLS" should be checked.
Click "Add Account".
Google will check the credentials and add the new email address.
A new box will appear saying a confirmation email has been sent.
(This email may not come through yet if our MailGun isn't verified due to the name server records not being updated.)
Click "Close Window" on the pop-up.
Keep this page open and swap back to the MailGun page.
Let's now try to verify the domain in MailGun.
(This relies on the name server records have being updated so don't panic if this step fails.)
If your domain is already showing as "Active", you can skip the below step.
Still on the Domains settings page, scroll down and click on "Check DNS Records".
If your name server records have been updated, it should now show as "Active".
If it failed to find any of the records, then you may need to wait longer for the name server records to be changed. Over the next few hours, continue to try the Check DNS Records button.
If you find some records have a green tick but some don't, then go back to CloudFlare and double check the records are the same as they have listed. Make the required changed and check the DNS records again.
Once it is Active, we can continue.
We can close the MailGun page now.
-------------------------------------------------------------------------
Swap back to the gmail page.
Click "verify" next to the @domain address.
On the pop-up click "Resend Email"
Then click "Close Window"
Click "Inbox" on the left to get back to your emails.
You should have an email from Mailgun saying your domain is verified.
And, we should have a confirmation email from Gmail for our new email address.
You may need to Click refresh a few times to wait for the confirmation email to come in.
Open the confirmation email, and click the confirmation link.

A new page will open - then click "Confirm" button.
Return back to your gmail inbox.
Click the cog on the right and then select "Settings"
Then click "Accounts and Import"
Now click "make default" next to the new @domain email address.

That is our emails all setup :)
You can now compose emails from your new @domain email address in gmail, and receive the replies.
Try out sending an email to yourself from another email address, also try the catchall by sending an email to anything@domain. Now you can order pizza using the email address pizza@mynamegoeshere.com or book movie tickets using starwars@mynamegoeshere.com. The emails will simply be forwarded to your inbox as normal :)
We can now close gmail and do the final step.
-------------------------------------------------------------------------
Now that our name servers have been updated, we can finish directing our domain to our blog.
Head back to blogger.com and login using your @gmail credentials.
Click back into the blog we created earlier.
Now, navigate back to Settings -> Basic and click "Set up a third-party URL for this blog" again.
Same as last time, enter in your domain name (including a www) and click "Save".
This time, there should be no errors and the domain will be added.

Now, click Edit next to the domain name.
Tick the check-box next to "Redirect mynamegoeshere.com to www.mynamegoeshere.com"
and click "Save"

That's now all done.
You should be able to visit www.mynamegoeshere.com in your browser and view your empty blog.
If you don't have the www, it should redirect you to the www site.
-------------------------------------------------------------------------
That's it!
Explore the blogger.com site and you can easily add contact / about pages etc.
You could make it into a basic website and not even have a blog on it.
Still, it's free hosting :)
Also, the Gmail app for your smartphone will automatically pickup the send from email addresses you have created. So, you can use the app as well as the webmail to send emails.
Just remember that the sign in credentials are the @gmail email address (not your @domain email address)
Enjoy!